Spring提供的原生的OAuth2依赖内置了几种比较常用的授权方式:password、authorization-code、client_credentials、refresh_token、implicit等,虽然可以满足我们日常的需求,不过针对一些特殊的需求还是捉襟见肘,有点无奈,比如:微信登录、短信登录…,针对这一点ApiBoot通过修改Spring OAuth2依赖的源码,可以根据业务进行自定义添加grantType。
创建项目
我们先来使用IDEA创建本章的项目,pom.xml添加的依赖如下所示:
1
2
3
4
5
6
7
8
9
10
11
12
13
14
15
16
17
18
19
20
21
22
23
24
25
26
27
28
29
30
31
32
33
| <dependencies>
<dependency>
<groupId>org.springframework.boot</groupId>
<artifactId>spring-boot-starter-web</artifactId>
</dependency>
<dependency>
<groupId>org.minbox.framework</groupId>
<artifactId>api-boot-starter-security-oauth-jwt</artifactId>
</dependency>
<dependency>
<groupId>mysql</groupId>
<artifactId>mysql-connector-java</artifactId>
</dependency>
<dependency>
<groupId>com.zaxxer</groupId>
<artifactId>HikariCP</artifactId>
</dependency>
<dependency>
<groupId>org.minbox.framework</groupId>
<artifactId>api-boot-starter-mybatis-enhance</artifactId>
</dependency>
</dependencies>
<dependencyManagement>
<dependencies>
<dependency>
<groupId>org.minbox.framework</groupId>
<artifactId>api-boot-dependencies</artifactId>
<version>2.2.0.RELEASE</version>
<type>pom</type>
<scope>import</scope>
</dependency>
</dependencies>
</dependencyManagement>
|
ApiBoot MyBatis Enhance使用文档详见ApiBoot Mybatis Enhance官网文档。
本章的源码在ApiBoot零代码整合Spring Security的JDBC方式获取AccessToken基础上进行修改,将之前章节源码的application.yml、SystemUser、SystemUserEnhanceMppaer、UserService文件复制到本章项目对应的目录内。
验证码登录逻辑
本章来讲下使用ApiBoot怎么完成自定义短信验证码登录的授权方式。
在短信验证码登录的逻辑中,大致的流程如下所示:
用户在获取验证码时,系统会将验证码保存到数据库内当用户输入验证码后提交登录时,读取验证码并判断有效性后最后获取手机号对应的用户信息完成登录逻辑。返回请求令牌
根据验证码登录的流程来看我们首先需要创建一个验证码数据表,用来保存用户发送的验证码数据,在第3步中需要通过手机号获取对应的用户信息,所以我们还要修改之前章节创建的表结构,添加一列,下面我们开始进行改造。
验证码表结构
在数据库内创建一个名为phone_code的数据表,并初始化一条验证码数据(模拟已经用户已经发送了验证码),SQL如下所示:
1
2
3
4
5
6
7
8
9
| CREATE TABLE `phone_code` (
`pc_id` int(11) NOT NULL AUTO_INCREMENT COMMENT '主键自增',
`pc_phone` varchar(11) COLLATE utf8mb4_general_ci DEFAULT NULL COMMENT '手机号',
`pc_code` varchar(6) COLLATE utf8mb4_general_ci DEFAULT NULL COMMENT '验证码内容',
`pc_create_time` timestamp NULL DEFAULT CURRENT_TIMESTAMP COMMENT '验证码生成时间',
PRIMARY KEY (`pc_id`)
) ENGINE=InnoDB AUTO_INCREMENT=2 DEFAULT CHARSET=utf8mb4 COLLATE=utf8mb4_general_ci COMMENT='手机号验证码信息表';
INSERT INTO `phone_code` VALUES (1,'17111111111','123123','2019-12-04 03:01:05');
|
验证码实体
对应phone_code表结构编写一个数据实体,如下所示:
1
2
3
4
5
6
7
8
9
10
11
12
13
14
15
16
17
18
19
20
21
22
23
24
25
26
27
28
29
30
31
|
@Data
@Table(name = "phone_code")
public class PhoneCode {
@Column(name = "pc_id")
@Id(generatorType = KeyGeneratorTypeEnum.AUTO)
private Integer id;
@Column(name = "pc_phone")
private String phone;
@Column(name = "pc_code")
private String code;
@Column(name = "pc_create_time")
private Timestamp createTime;
}
|
验证码数据接口
为PhoneCode验证码数据实体添加一个查询的数据接口,实现ApiBoot MyBatis Enhance提供的EnhanceMapper<Entity,ID>接口,如下所示:
1
2
3
4
5
6
7
8
9
10
11
12
13
14
15
|
public interface PhoneCodeEnhanceMapper extends EnhanceMapper<PhoneCode, Integer> {
PhoneCode findByPhoneAndCode(@Param("phone") String phone, @Param("code") String code);
}
|
通过ApiBoot MyBatis Enhance提供的方法命名规则查询语法,我们可以根据指定的phone、code查询出对应的记录。
验证码业务逻辑
为验证码查询提供一个业务逻辑实现类,如下所示:
1
2
3
4
5
6
7
8
9
10
11
12
13
14
15
16
17
18
19
20
21
22
23
24
|
@Service
public class PhoneCodeService {
@Autowired
private PhoneCodeEnhanceMapper mapper;
public PhoneCode findPhoneCode(String phone, String code) {
return mapper.findByPhoneAndCode(phone, code);
}
}
|
修改用户表结构
我们在ApiBoot零代码整合Spring Security的JDBC方式获取AccessToken文章内创建的system_user用户表的基础上添加一个字段,如下所示:
1
2
| alter table system_user
add su_phone varchar(11) null comment '手机号';
|
字段添加后初始化表内yuqiyu这条数据的列值,我在phone_code表内添加的手机号为17111111111,所以我需要更新su_phone字段的值为17111111111。
了解ApiBootOauthTokenGranter
基础的代码实现我们都已经准备好了,下面我们来介绍下本章的主角ApiBootOauthTokenGranter接口,该接口为自定义GrantType而生,由ApiBoot OAuth2提供,源码如下所示:
1
2
3
4
5
6
7
8
9
10
11
12
13
14
15
16
17
18
19
20
21
22
23
24
25
26
27
28
29
|
public interface ApiBootOauthTokenGranter extends Serializable {
String grantType();
UserDetails loadByParameter(Map<String, String> parameters) throws ApiBootTokenException;
}
|
grantType():该方法的返回值用于告知OAuth2自定义的GrantType是什么,根据自己的业务逻辑而定。loadByParameter:该方法是自定义GrantType的业务实现,parameters参数内包含了自定义授权请求/oauth/token时所携带的全部参数,如:/oauth/token?grant_type=phone_code&phone=xx&code=xx,会把phone、code参数一并传递给该方法。
实现短信验证码授权方式
下面我们来创建一个名为PhoneCodeGrantType的自定义授权类,实现ApiBootOauthTokenGranter接口,如下所示:
1
2
3
4
5
6
7
8
9
10
11
12
13
14
15
16
17
18
19
20
21
22
23
24
25
26
27
28
29
30
31
32
33
34
35
36
37
38
39
40
41
42
43
44
45
46
47
48
49
50
51
52
53
54
55
56
57
58
59
|
@Component
public class PhoneCodeGrantType implements ApiBootOauthTokenGranter {
private static final String GRANT_TYPE_PHONE_CODE = "phone_code";
private static final String PARAM_PHONE = "phone";
private static final String PARAM_CODE = "code";
@Autowired
private PhoneCodeService phoneCodeService;
@Autowired
private UserService userService;
@Override
public String grantType() {
return GRANT_TYPE_PHONE_CODE;
}
@Override
public UserDetails loadByParameter(Map<String, String> parameters) throws ApiBootTokenException {
String phone = parameters.get(PARAM_PHONE);
String code = parameters.get(PARAM_CODE);
PhoneCode phoneCode = phoneCodeService.findPhoneCode(phone, code);
if (ObjectUtils.isEmpty(phoneCode)) {
throw new ApiBootTokenException("登录失败,验证码:" + code + ",已过期.");
}
UserDetails userDetails = userService.findByPhone(phone);
if (ObjectUtils.isEmpty(userDetails)) {
throw new ApiBootTokenException("用户:" + phone + ",不存在.");
}
return userDetails;
}
}
|
在loadByParameter方法内,我们首先获取到了本次登录的手机号(phone)、验证码(code)这两个参数,查询是否存在这条验证码的记录(PS:这里没做验证码过期时间限制,自己的业务请把这块加上),验证码验证通过后查询出手机号对应的用户信息并将用户返回交付给ApiBoot OAuth2框架来完成验证。
在验证业务逻辑方法内如果出现异常可以直接使用ApiBootTokenException异常进行抛出。
运行测试
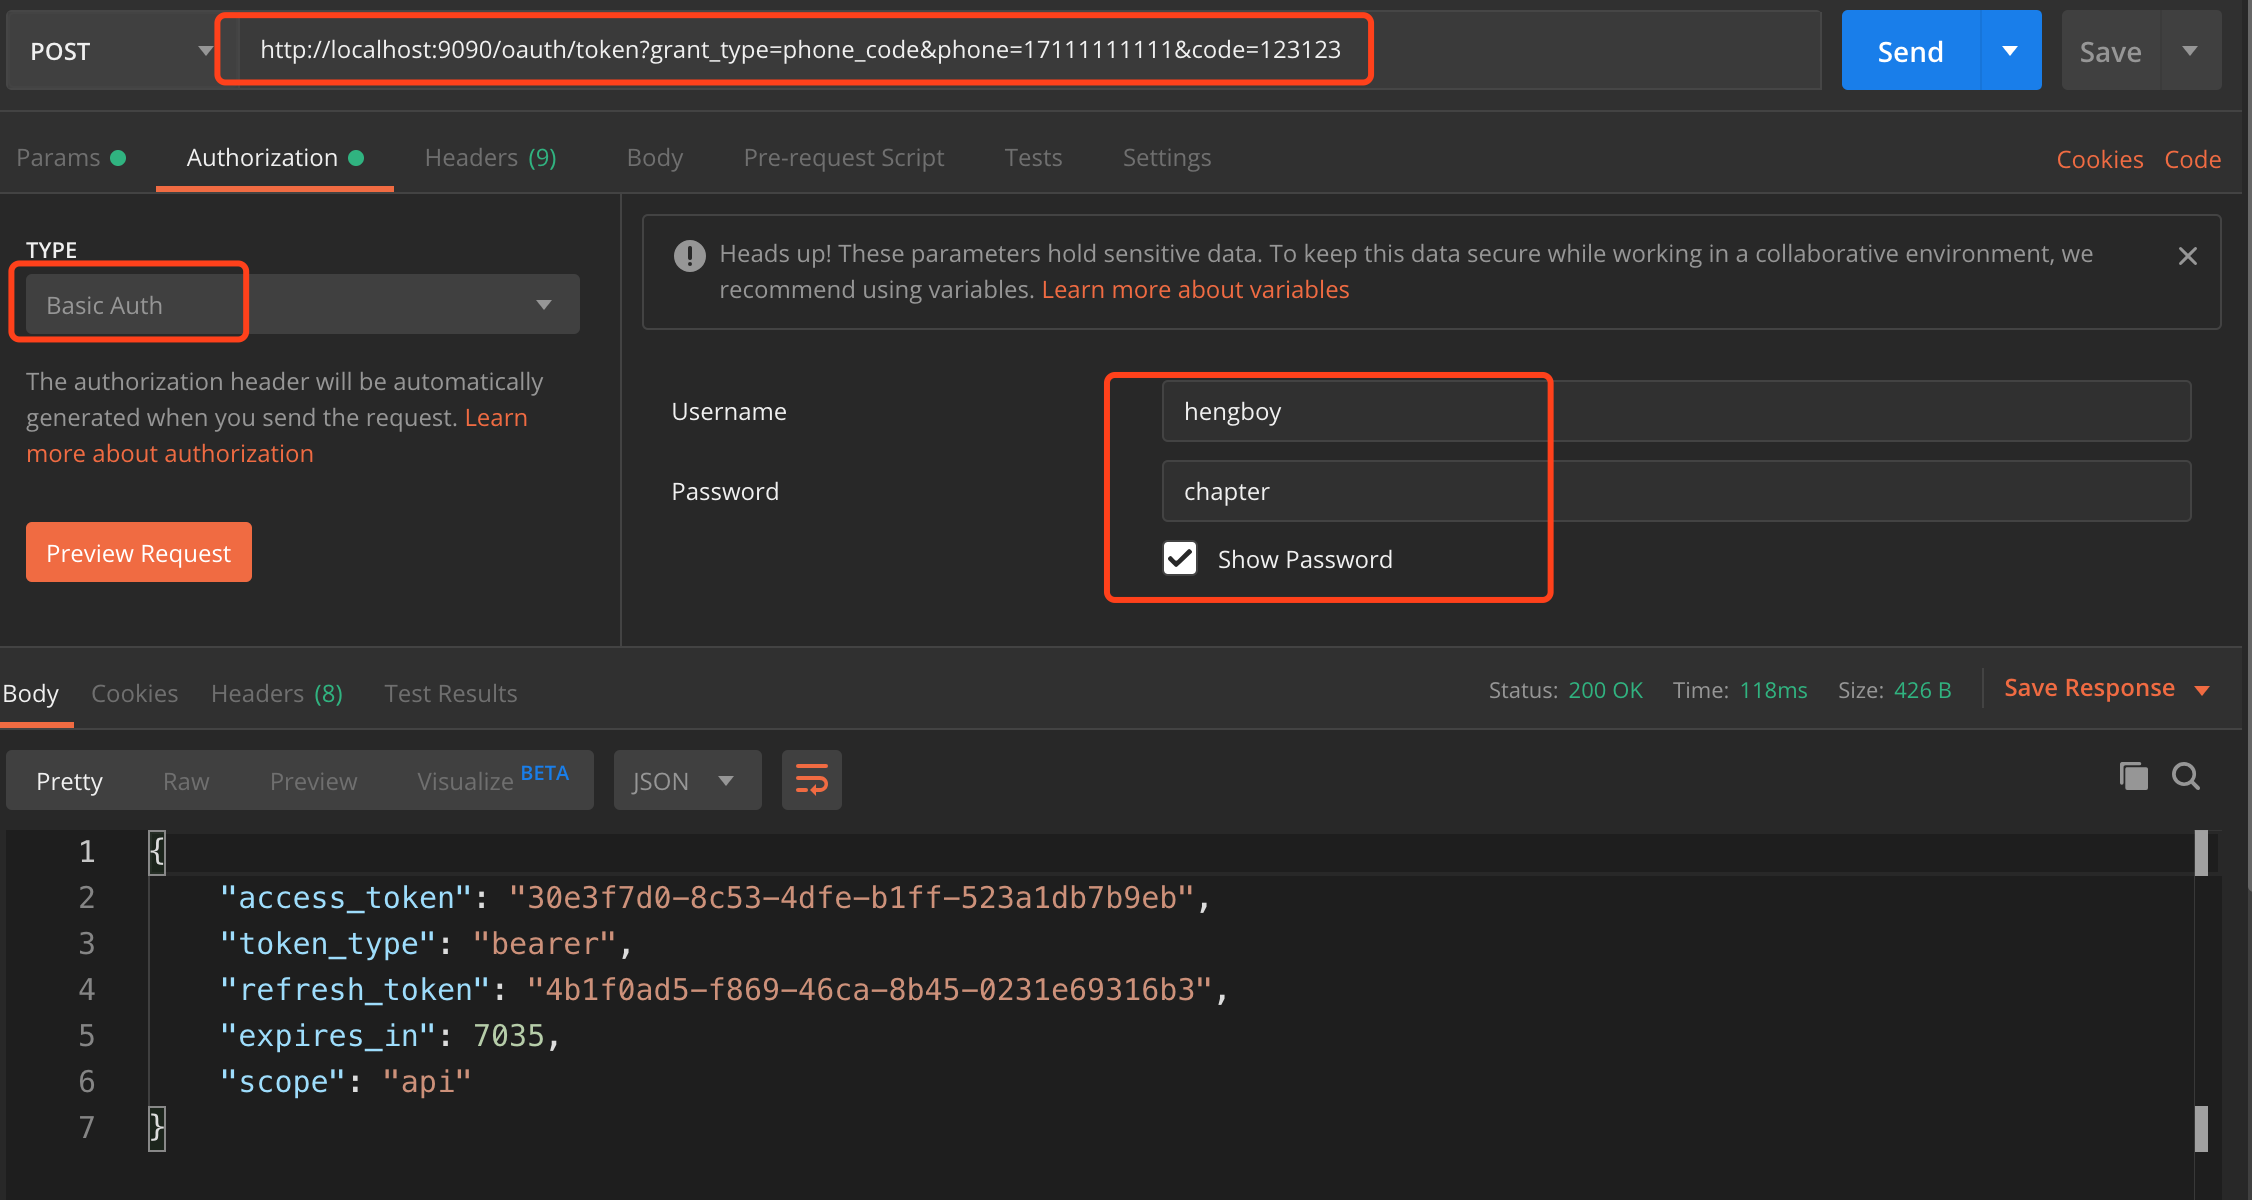
将我们的项目运行起来,下面通过CURL的方式尝试获取AccessToken,如下所示:
1
2
| ➜ ~ curl -X POST hengboy:chapter@localhost:9090/oauth/token -d 'grant_type=phone_code&phone=17111111111&code=123123'
{"access_token":"30e3f7d0-8c53-4dfe-b1ff-523a1db7b9eb","token_type":"bearer","refresh_token":"4b1f0ad5-f869-46ca-8b45-0231e69316b3","expires_in":7194,"scope":"api"}
|
使用postman方式获取AccessToken,如下图所示:

敲黑板,划重点
本章根据短信验证码登录的例子来给大家讲解了使用ApiBoot OAuth2怎么进行自定义授权方式来获取AccessToken,例子讲解注重点是在自定义GrantType,在生产使用时还请根据各种情况进行验证,保证数据的安全性。
代码示例
如果您喜欢本篇文章请为源码仓库点个Star,谢谢!!!
本篇文章示例源码可以通过以下途径获取,目录为apiboot-define-oauth-grant-type:


 OAuth vs SAML vs OpenID


