自从SpringBoot升级到了2.0版本后集成Redis作为缓存就更为简单了,我们只需要配置Redis相关的链接信息以及使用注解@EnableCaching开启缓存,这样我们就直接可以在项目内使用缓存相关的内容。
本章目标 基于SpringBoot2完成快速集成Reids作为项目缓存,并讲解一些缓存常用的配置。
构建项目 如果之前本地没有Redis环境,请访问第十六章:使用Redis作为SpringBoot项目数据缓存 文章阅读配置,接下来SpringBoot项目,添加本站所使用的依赖,pom.xml配置文件如下所示:
1
2
3
4
5
6
7
8
9
10
11
12
13
14
15
16
17
18
19
20
21
22
23
24
25
26
27
28
29
30
31
32
33
34
35
36
37
38
39
40
41
42
43
44
45
46
47
48
49
50
51
52
53
54
55
56
57
58
59
60
...省略部分配置 <dependencies > <dependency > <groupId > org.springframework.boot</groupId > <artifactId > spring-boot-starter-data-jpa</artifactId > </dependency > <dependency > <groupId > org.springframework.boot</groupId > <artifactId > spring-boot-starter-data-redis</artifactId > </dependency > <dependency > <groupId > org.springframework.boot</groupId > <artifactId > spring-boot-starter-web</artifactId > </dependency > <dependency > <groupId > mysql</groupId > <artifactId > mysql-connector-java</artifactId > <scope > runtime</scope > </dependency > <dependency > <groupId > com.alibaba</groupId > <artifactId > druid-spring-boot-starter</artifactId > <version > 1.1.8</version > </dependency > <dependency > <groupId > org.projectlombok</groupId > <artifactId > lombok</artifactId > <optional > true</optional > </dependency > <dependency > <groupId > com.alibaba</groupId > <artifactId > fastjson</artifactId > <version > 1.2.44</version > </dependency > <dependency > <groupId > org.springframework.boot</groupId > <artifactId > spring-boot-starter-test</artifactId > <scope > test</scope > </dependency > <dependency > <groupId > org.databene</groupId > <artifactId > contiperf</artifactId > <version > 2.3.4</version > <scope > test</scope > </dependency > <dependency > <groupId > javax.xml.bind</groupId > <artifactId > jaxb-api</artifactId > <version > 2.3.0</version > </dependency > </dependencies > ...省略部分配置
在本章的依赖内我们添加了contiperf性能测试工具,用于测试分别从数据库、缓存内读取的性能差异。
配置Redis信息 我比较喜欢使用yml文件方式进行配置,先来删除之前项目自动创建的application.properties文件,新创建一个名为application.yml的配置文件,添加Redis相关的配置信息到application.yml文件内,如下所示:
1
2
3
4
5
6
7
8
9
10
11
12
13
14
spring: application: name: spring-boot-redis jpa: database: mysql show-sql: true datasource: druid: username: root password: 123456 url: jdbc:mysql://localhost:3306/test redis: password: hengyuboy
由于Redis有很多默认的配置,默认连接localhost上的Redis,我们这里仅仅配置连接的密码就可以了,其他的都使用默认的配置。
开启缓存 我们找到创建的XxxApplication入口程序类,在该类上添加@EnableCaching注解完成开启缓存,如下所示:
1 2 3 4 5 6 7 8 9 10 @SpringBootApplication @EnableCaching public class SpringBootRedisApplication {}
测试 到现在我们的缓存已经配置完成了,是不是比之前SpringBoot1.x.x版本的时候要简单很多,当然如果你有一些额外的自定义配置也是可以很简单的集成。SpringDataJPA,如果你之前并没有使用过SpringDataJPA请访问第十三章:SpringBoot实战SpringDataJPA 来阅读学习。
测试添加缓存 我们先来创建一个查询方法完成简单的数据缓存,方法如下所示:
1 2 3 4 5 6 7 8 9 @Cacheable(cacheNames = "user.service.all") public List<TestUserEntity> findAll () { return userRepository.findAll(); }
接下来编写一个简单的单元测试,我们直接使用创建项目时创建的测试类,在测试类内添加一个测试方法,如下所示:
1 2 3 4 5 6 7 @Test public void findAll () { userService.findAll(); }
当我们第一次启动findAll测试方法时可以看到控制台输出的SQL,如下所示:
1 Hibernate: select testuseren0_.ui_id as ui_id1_0_, testuseren0_.ui_age as ui_age2_0_, testuseren0_.ui_name as ui_name3_0_, testuseren0_.ui_password as ui_passw4_0_ from test_user_info testuseren0_
本次的数据是从数据库内查询到的,接下来我们再次执行 findAll方法来看下控制台,这时我们并没有看到输出的SQL,证明本次的数据是从Redis缓存内读取得到的。
性能测试 我们在pom.xml配置文件内已经添加了性能测试的依赖contiperf,那么下面我们来测试下从 Redis内读取数据与 数据库内读取输出的性能差异。
1
2
3
4
5
6
7
8
9
10
11
12
@Rule public ContiPerfRule i = new ContiPerfRule ();@Test @PerfTest(invocations = 100000, threads = 100) public void contextLoads () { userService.findAll(); }
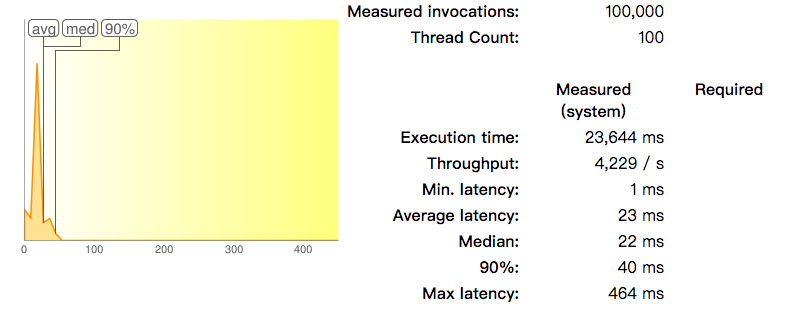
我们的测试是查询10万次,并且开启100个线程来完成这个测试方法,我们先来测试使用缓存的性能,如下图所示:contiperf执行生成的数据统计,当我们运行性能测试方法完成后,contiperf就会自动在target->contiperf-report下自动生成一个index.html来统计本次执行的状况。Redis缓存时一共耗时23秒,下面我们把@Cacheable(cacheNames = "user.service.all")注解注释掉,再来执行一遍性能测试方法。
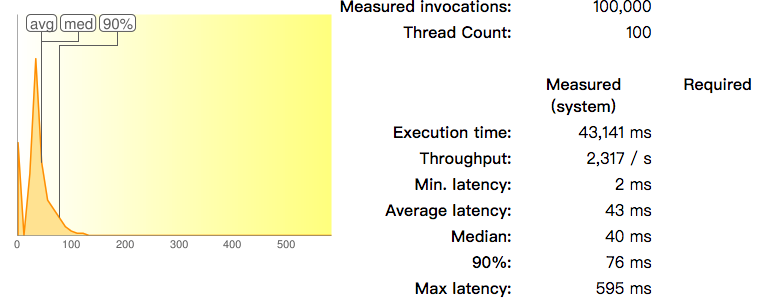
我们在运行测试的时候可以看到控制台的查询SQL在不停的输出,这也证明了我们的数据是直接从数据库内获取的,测试结果如下图所示:43秒,效果已经很明显了,当然我这是本机模拟测试,如果是读取正在大并发高IO读取的服务器上时差距会更大。
总结 本章主要讲解了SpringBoot2.0版本如何快速的集成Redis。
1
2
3
4
第一步:添加spring-boot-starter-data-redis依赖 第二步:配置@EnableCaching开启缓存 第三步:在application.yml内配置Redis相关的信息 第四步:配置@Cacheable注解完成数据缓存


 OAuth vs SAML vs OpenID


